
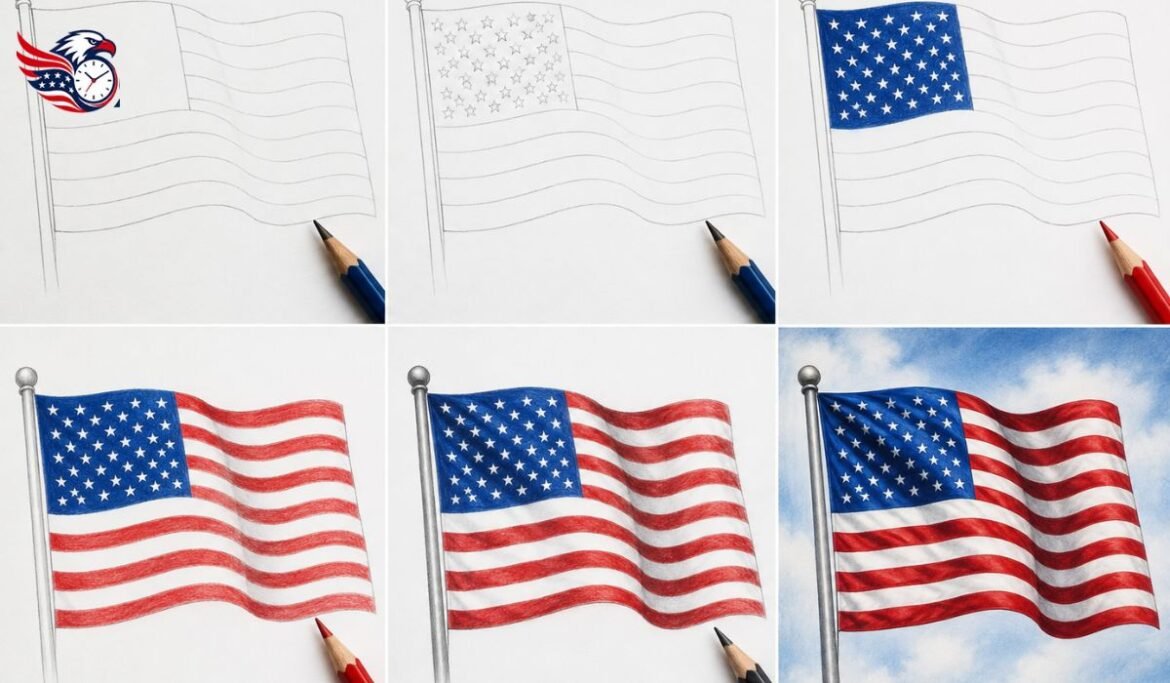
Learning USA flag drawing is one of the most rewarding art projects you can try, no matter your age or skill level. The flag is one of the most recognized symbols in the world, and once you understand its basic shapes, drawing it becomes much simpler than it looks. This tutorial breaks the process down into small, easy steps so you can draw a realistic, waving American flag in just a few minutes. Whether you are a parent helping a child with a school project, a student working on a patriotic art assignment, or an adult picking up a pencil for fun, this guide will walk you through everything you need to know.
Many people feel nervous when they try USA flag drawing for the first time. The stripes, the stars, and the wavy movement of the fabric can seem hard to get right. But once you break the flag into simple shapes, like lines, curves, and small dots, the whole picture comes together naturally. You do not need to be a professional artist to create a flag drawing that looks clean, balanced, and full of life. All you need is a little patience and the right steps to follow.
Why Learn to Draw the USA Flag
The American flag carries deep meaning, and drawing it is a wonderful way to connect with that history through art. It is often drawn during patriotic holidays such as the Fourth of July, Memorial Day, Veterans Day, and Flag Day. Students frequently draw it for history projects or social studies class, since the flag helps explain important lessons about the founding of the United States. Beyond school, many hobby artists enjoy drawing the flag simply because it is a fun challenge that combines straight lines, curves, and small repeated shapes.
Drawing a flag also builds real art skills that apply to many other subjects. You will practice spacing, symmetry, shading, and how to make a flat object look like it is moving. These are skills that carry over into drawing clothing, banners, curtains, and other fabric-based objects. In other words, once you learn how to draw a waving flag, you will find it easier to draw many other things that involve folds and movement.
What You Need Before You Start
Before jumping into the steps, it helps to gather a few basic supplies. You do not need anything expensive or complicated to complete this project.
- A pencil for sketching the outline
- An eraser to fix small mistakes
- A black pen or marker to trace your final lines
- Red, white, and blue coloring tools, such as crayons, colored pencils, or markers
- A ruler, which is optional but helpful for straight edges
Once you have these items ready, you are fully prepared to begin your USA flag drawing from start to finish.
Step-by-Step: How to Draw a Realistic Waving USA Flag
This section walks you through the entire process in order. Take your time with each step, and remember that light pencil marks are always easier to correct than dark, heavy lines.
Step 1: Draw the Flagpole
Start by drawing two narrow, parallel vertical lines close together. This forms the flagpole that will hold your flag in place. At the top of the pole, add a small circle or oval shape. This little detail represents the finial, the decorative piece often seen at the top of real flagpoles. Keep this part simple, since the pole is just a support for the main drawing.
Step 2: Sketch the Waving Outline
Next, draw the overall shape of the flag coming off the pole. Instead of a plain rectangle, use soft, curved lines to show the fabric moving in the wind. Picture the flag as if a gentle breeze is pushing it outward. The top and bottom edges should curve gently, while the right side, farthest from the pole, can dip and rise slightly to create a natural wave. This waving outline is what makes your USA flag drawing look realistic instead of flat and stiff.
Step 3: Add the Canton, or Star Field
In the upper left corner of the flag, near the pole, draw a rectangle. This section is called the canton, and it is where the stars will eventually go. Because the flag is waving, this rectangle should follow the same curve as the rest of the flag rather than staying perfectly straight. It should take up about one-third of the flag’s width and a little less than half of its height.
Step 4: Draw the Stripes
Below and beside the canton, draw a series of horizontal lines running across the flag. The real American flag has thirteen stripes in total, alternating between red and white, and these stripes represent the original thirteen colonies. If you are drawing a smaller version or working with younger children, it is perfectly fine to simplify this and draw fewer stripes. The important part is that the pattern starts and ends with a red stripe, and that the lines follow the same wavy motion as the outer edge of the flag.
Step 5: Add the Stars
Inside the canton rectangle, add small stars arranged in neat rows. The official flag has fifty stars, one for every state, but drawing all fifty by hand can be tricky for beginners. You can simplify this by drawing a smaller grid of stars, or even using small dots or tiny circles if five-pointed stars feel too difficult. What matters most is that the canton looks full and evenly spaced, so it reads clearly as the star field at a glance.
Step 6: Coloring Your Flag
Once your pencil sketch is complete, trace over your lines with a black pen or marker so they stand out clearly. After the ink has dried, erase any leftover pencil marks. Now it is time to add color. Fill the canton with blue and leave the stars white, then color the stripes in alternating red and white, making sure the top stripe is red. Take your time with this step, since clean, even coloring is what gives your finished flag a polished, professional look.
Common Mistakes to Avoid
Many beginners rush through their USA flag drawing and end up with a lopsided or stiff-looking result. One common mistake is making the canton too small or placing it in the wrong spot, which throws off the entire balance of the flag. Another frequent error is drawing all straight lines with no curve at all, which makes the flag look flat instead of like real, moving fabric.
Uneven spacing between stripes is another issue that shows up often, especially when a ruler is not used. If your stripes are different widths, the flag can look messy even if every other part is drawn well. Take a moment before you start coloring to check that your stripes and stars are evenly spaced. It is much easier to fix these small issues in pencil than after you have already added ink and color.
The Meaning Behind the Colors and Symbols
Understanding what the American flag represents can make the drawing process feel more meaningful. The color red stands for courage, hardiness, and valor, often linked to the bravery of those who fought for the country’s independence. White represents purity and innocence, while blue symbolizes vigilance, perseverance, and justice. These meanings were not officially explained when the flag was first adopted in 1777, but they were later described by Charles Thomson, secretary of the Continental Congress, and have remained closely tied to the flag ever since.
The thirteen stripes represent the original thirteen colonies that broke away from British rule to form a new nation. The fifty stars, one for each state, reflect how the country has grown over time. When you draw the flag, you are not just recreating lines and colors. You are illustrating a symbol that carries centuries of history, sacrifice, and national identity within a simple, recognizable design.
A Short History of the American Flag
The flag we recognize today has changed quite a bit since it was first introduced. On June 14, 1777, the Continental Congress passed a resolution establishing the basic design, with thirteen alternating red and white stripes and thirteen white stars set against a blue field. As new states joined the country, stars were added to the canton, leading to more than two dozen official versions of the flag over the years.
The flag has earned several nicknames throughout its history, including Old Glory, the Stars and Stripes, and the Star-Spangled Banner. Each name reflects the deep respect Americans have held for this symbol through wars, celebrations, and everyday life. Knowing this background can add a nice personal touch if you plan to write a caption or short description alongside your finished drawing.
Tips for Kids and Beginners
If you are helping a child with their first USA flag drawing, keep the process light and encouraging rather than focused on perfection. Young artists do not need to draw exactly fifty stars or count out all thirteen stripes with total precision. As long as the drawing starts and ends with red stripes and the blue section looks filled with white stars, anyone looking at it will immediately recognize it as the American flag.
For older beginners who want a bit more detail, using a ruler for the stripes and a light grid for spacing out the stars can make a noticeable difference in the final result. Practicing the wavy outline separately before combining it with the stripes and stars can also help you feel more confident with the overall shape. Like most drawing skills, USA flag drawing becomes easier and more natural the more times you practice it.
Final Thoughts
USA flag drawing is a simple, enjoyable project that blends basic art skills with a meaningful piece of history. By breaking the process into small steps, from the flagpole and wavy outline to the stripes, stars, and final coloring, anyone can create a flag drawing that looks realistic and full of movement. It is a great activity for classrooms, holiday crafts, or a quiet afternoon of practicing your drawing skills at home.
Remember that your first attempt does not need to be perfect. Focus on the basic shapes, keep your lines light until you are happy with the layout, and add color with care at the end. With a little patience, you will have a finished American flag drawing that you can be proud to display, gift, or use for your next school or holiday project.
Frequently Asked Questions (FAQs)
1. How do you draw a USA flag step by step for beginners?
Start with the flagpole, then sketch a wavy outline for the flag shape, add the star field in the top left corner, draw thirteen alternating stripes, fill in the stars, and finish by tracing and coloring your final design.
2. How many stripes and stars does the American flag have?
The American flag has thirteen stripes representing the original colonies and fifty stars representing the fifty states, though beginners can simplify the count for an easier drawing.
3. What colors are used in a USA flag drawing?
The flag uses red, white, and blue, with red and white forming the alternating stripes and blue filling the canton behind the white stars.
4. Do I need a ruler to draw the American flag?
A ruler is not required, but it can help you keep your stripes evenly spaced and your canton neatly proportioned, especially if you want a very clean, precise result.
5. How can I make my flag drawing look like it is waving?
Use soft, curved lines instead of straight edges along the top, bottom, and right side of the flag, and make sure your stripes follow the same gentle curve to show natural movement.
6. Is USA flag drawing suitable for kids?
Yes, this project works well for kids since it can be simplified with fewer stripes and simple star shapes, making it a fun and educational activity for classrooms or home practice.
7. What do the colors on the American flag represent?
Red stands for courage and valor, white represents purity, and blue symbolizes vigilance, perseverance, and justice, meanings that have been closely tied to the flag since the country’s early history.
Read Next: English Horn Explained: History, Sound, and Uses in Classical Orchestras Today






One thought on “Easy USA Flag Drawing Tutorial: Draw a Realistic Waving Flag in Minutes”
Comments are closed.